The pandemic changed the world in ways you could not have imagined. A million new businesses popped up online, including businesses to teach how to build a business. With all the talks about creating a successful business, “Funnel” has been a central topic. And now have all kinds of Funnels, from Marketing to Sales. But why do you need one? Read along as we dive deep into the Salesforce Lead Funnels.
Addressing Crucial Business Challenges
Establishing or expanding a business entails overcoming challenges in today’s competitive market. With numerous brands competing for customer attention, fostering loyalty becomes a significant hurdle. Recognizing the intricacies of customer behavior is crucial to addressing these issues and improving marketing strategies to attract leads with higher conversion potential. Here are 5 key challenges that businesses of today face:
- Lack of Comprehensive Understanding
- Inefficient Sales Processes
- Poor Conversion Rates
- Lead Generation Challenges
- Limited Team Collaboration
The Salesforce Lead Funnel can fix that
Funnels are the visual representation of steps a potential customer goes through before making a desired action, such as a purchase or sign-up. The term “Funnel” is used because, at each stage of the process, the number of potential customers typically decreases, resembling the shape of a funnel. Implementing a suitable tracking funnel in your business can aid with:
- Comprehensive Insights: Implementation of a Conversion Tracking Funnel provides comprehensive insights, offering a holistic view of the lead journey.
- Efficient Sales Processes: The funnel ensures optimized and streamlined sales processes, enhancing overall efficiency.
- Enhanced Conversion Rates: Targeted efforts within the funnel lead to improved conversion rates, overcoming previous challenges.
- Streamlined Lead Generation: The funnel simplifies and improves lead qualification, addressing challenges in the lead generation process.
- Optimized Team Collaboration: Implementation fosters seamless collaboration between sales and marketing teams, eliminating hurdles.
Harnessing the power of a Salesforce Lead Funnel can revolutionize your business. As we delve into the transformative impact of funnels on addressing challenges, you’ll not only grasp the importance but also embark on a journey to create your own tailored funnel. Our next section unfolds the step-by-step guide, empowering you to seamlessly integrate and leverage a customized funnel for unparalleled business success.
Building a Salesforce Lead Funnel
Crafting a Salesforce Lead Funnel entails leveraging diverse tools and features to oversee the advancement of leads or opportunities across distinct stages of the sales journey. Before initiating the creation of a Tracking Funnel in the Org, meticulous planning of stages is imperative based on the chosen Funnel type. This guide primarily focuses on the implementation of the standard Sales Funnel. The stages in a typical Salesforce conversion funnel may encompass:
- Awareness: Initial exposure to your product or service through marketing, ads, or other channels.
- Interest: Deeper engagement, measured by metrics like email opens, website visits, or social interactions.
- Consideration: Active evaluation, tracked through interactions with specific content or sales engagement.
- Intent: Clear expression of interest, demonstrated by actions like demo requests or trial downloads.
- Purchase/Conversion: Final stage, involving actual conversion through closed deals, transactions, or other key events.
Having strategized the stages for our funnel, the next step is choosing the object for implementation—be it custom or standard. This guide opts for the Opportunity object. With this decision made, let’s proceed to construct a Conversion Tracking Funnel within your Salesforce Org.
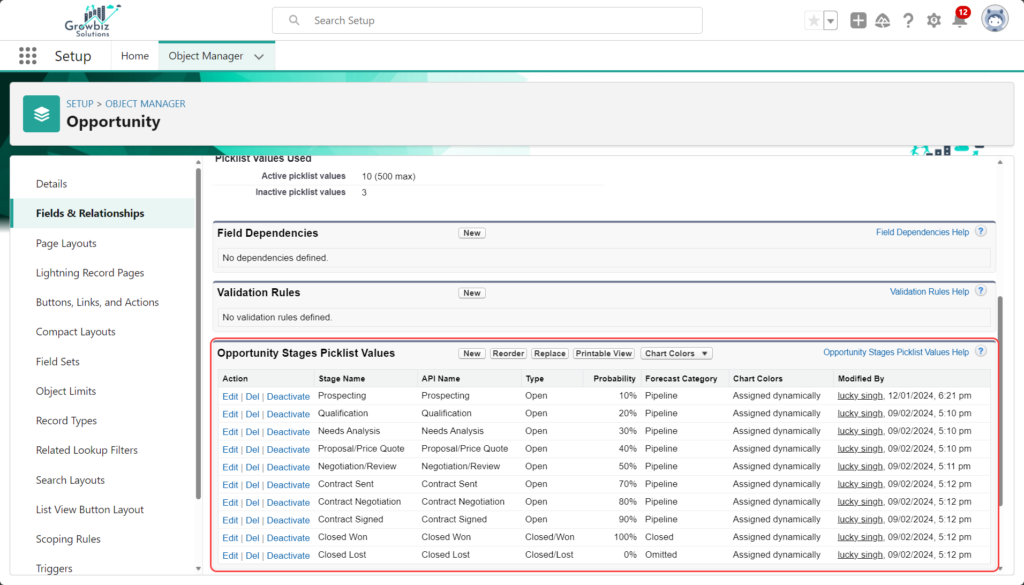
Step 1: Customize Stages in your Org
Customize the Stages field to align with your defined Funnel Stages in Salesforce. This involves modifying the desired SObject, allowing you to configure Stages on any custom SObject for a tailored tracking funnel. To add or edit Opportunity Stages, navigate to Setup → “Object Manager” Tab → “Opportunity” SObject → “Fields & Relationships” → “Stage” Field → “Opportunity Stages Picklist Values” Section
Step 2: Enable History Tracking
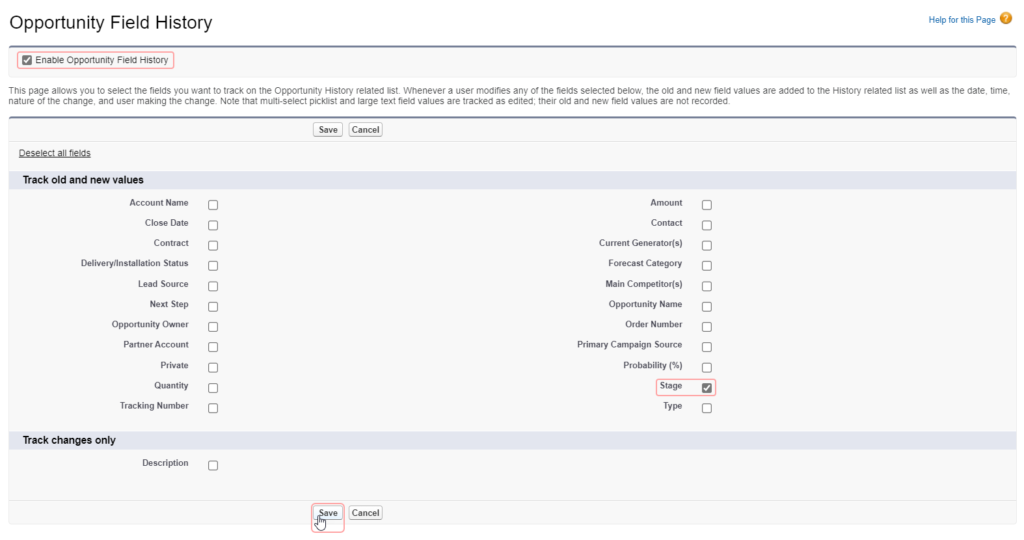
Enable Field History Tracking for the relevant SObject and fields to track changes over time, providing essential historical data. This is necessary for generating insightful Reports and Dashboards. For Custom SObjects, activate “Track Field History” in the Edit Custom Object page whereas for Standard SObjects, it’s not mandatory.
- Configure Custom SObject History Tracking: Setup → “Object Manager” Tab → SObject → “Details” → Edit → Optional Features → Check “Track Field History”
- Additionally, enable Field History Tracking: Setup → “Object Manager” Tab → SObject → “Fields & Relationships” → Set History Tracking → Check “Enable Object Field History” → Check Fields
Step 3: Create Reports
Leverage Salesforce Reports to construct an insightful tracking funnel for each stage, providing a visual representation of record transitions. If you are new to Salesforce, refer to this unit to learn how to create a Report. If you are familiar with the process, follow these steps to generate a comprehensive report on the journey of records:
- Create a new Report by navigating to: Reports Tab → New Report
- Choose the specific Report Type that aligns with your tracking requirements, ensuring accuracy in data representation. For example, with Object History Tracking enabled, we would create the report on Opportunity History.
- Implement filters to segregate records at each stage of your Salesforce Lead Funnel, utilizing status-based criteria such as Prospecting, Qualification, etc. We have grouped the records based on their journey from “From Stage” and “To Stage”.
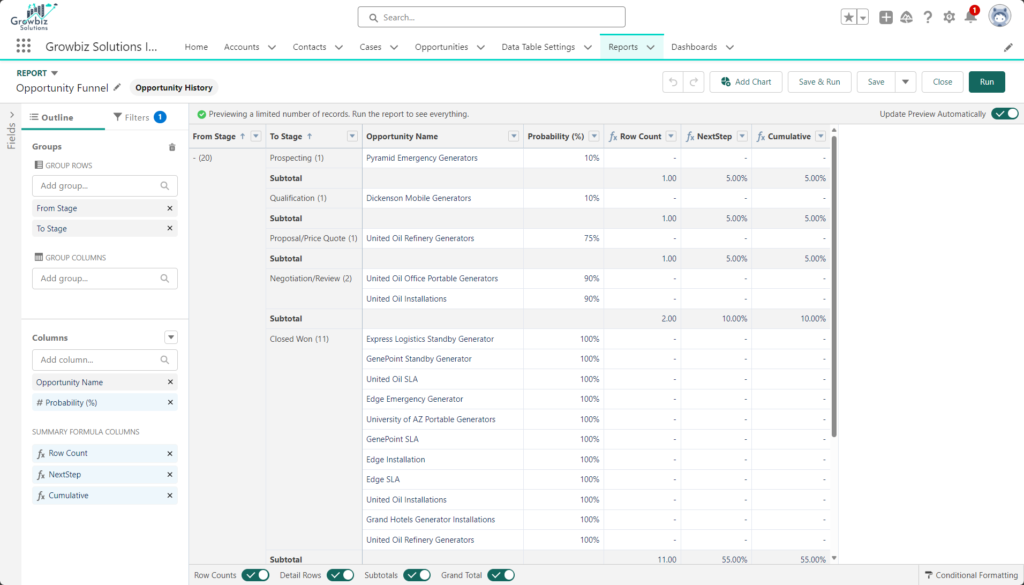
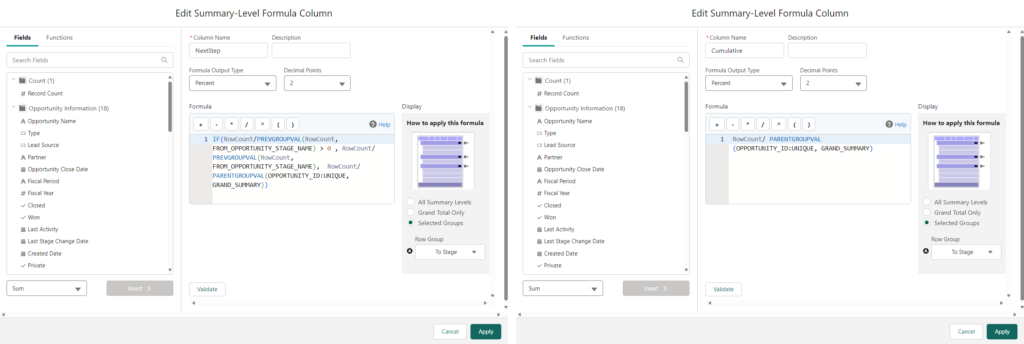
- Enhance report insights by customizing columns with relevant formulas, incorporating details like lead source, owner, and creation date. We have used two key Formula Columns: NextStep and Cumulative.
- NextStep: Used to calculate the quantity & percentage of records moving to the Next Stage.
- Cumulative: Used to calculate the quantity & percentage of records moving further or to the last step.
- Ensure clarity in report management by saving each report with a descriptive and easily identifiable name.
- Validate the accuracy of the generated reports by running them, confirming that they effectively portray leads within each designated stage.
- Optimize time and efficiency by automating the generation of reports, considering scheduled runs with automatic email distribution to key stakeholders.
Step 4: Create Dashboards
Use the Salesforce Dashboard to visualize the Reports of the tracking funnel. These reports can be combined into a dashboard for a comprehensive view. Refer to this unit to learn how to create a Dashboard.
- Create a new Dashboard by navigating to the Dashboard Tab → New Dashboard
- Integrate a Chart Widget into the dashboard to visually represent the compiled reports, offering a holistic view.
- Enhance the visual appeal by adjusting the size and arrangement of components within the dashboard, ensuring an organized and aesthetically pleasing layout.
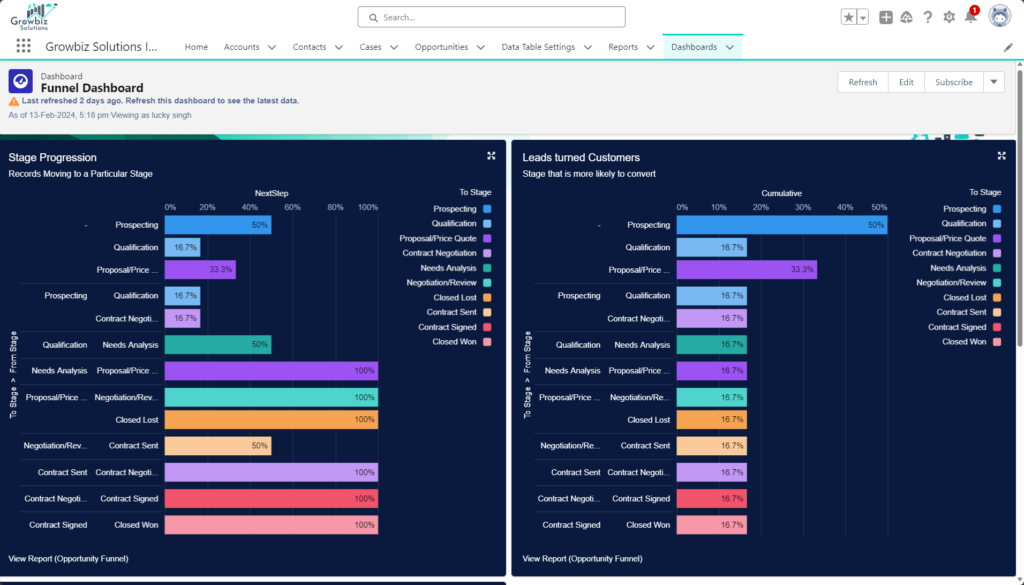
- We have two Bar Charts, based on each Formulas Columns.
- The Stage Progression chart is based on NextStep Formula Column. It brings insights into the stages from where the lead can continue its journey.
- The Leads Turned Customers chart is based on the Cumulative Formula Column. It visualizes the stage that is more likely to convert a Lead.
- Tailor each report component by incorporating filters or highlighting vital metrics using features like color-coded charts.
- Expand insights by including additional components showcasing key metrics such as conversion rates, lead sources, or owner performance.
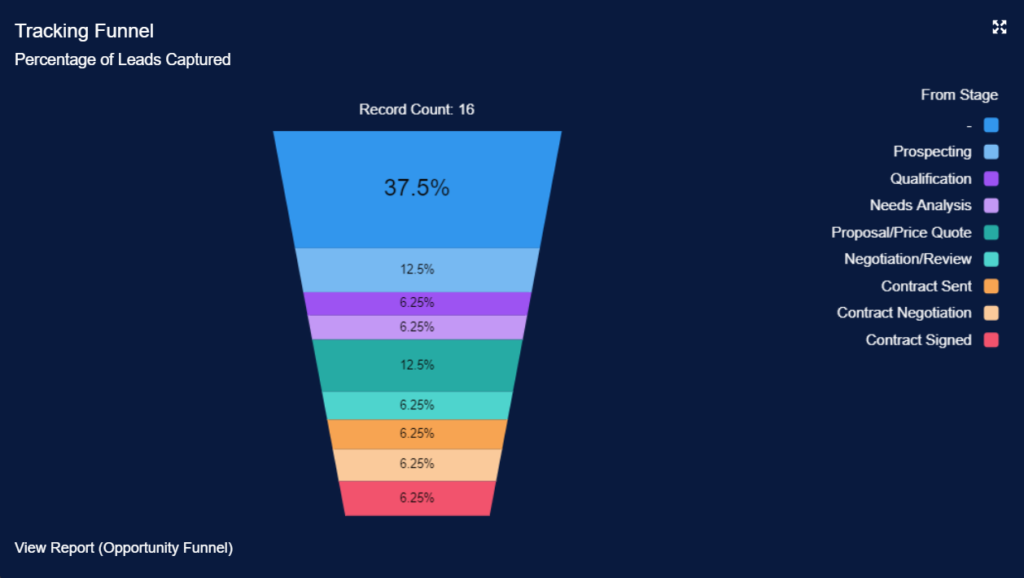
- Save the dashboard with a meaningful name, facilitating easy identification, and share it with relevant users or groups for real-time visibility into the funnel.
- Optimize efficiency by scheduling the dashboard to refresh at regular intervals, ensuring the display reflects up-to-date data for accurate decision-making.
Conclusion
Cultivating a successful Salesforce Lead Funnel involves strategic planning and meticulous customization. From defining stages to implementing insightful reports and dynamic dashboards, each step contributes to a holistic view of lead progression. Embrace this comprehensive guide to optimize your lead management, driving conversions with precision and efficiency in your Salesforce org.


